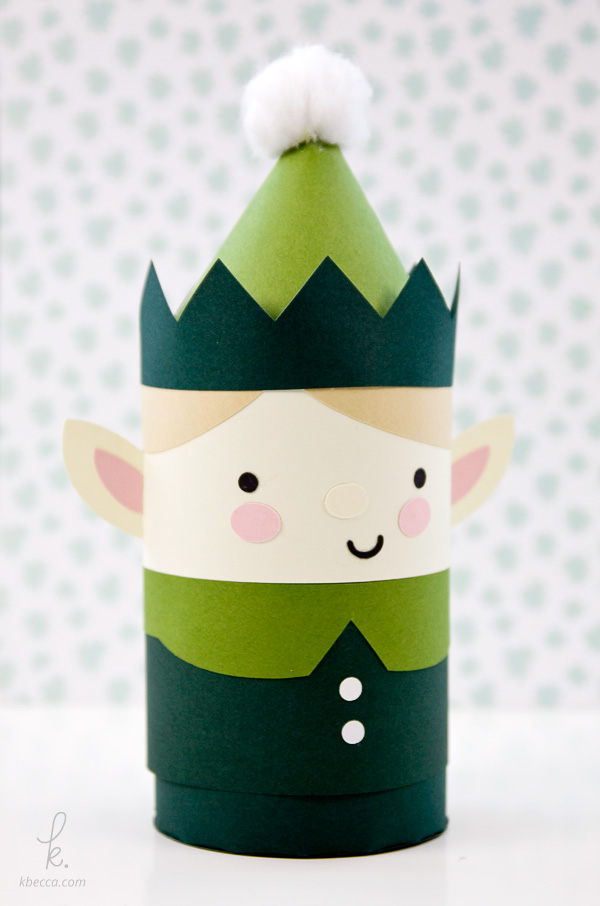
These are the assembly instructions for the Elvin the Elf cylinder gift box. To see all of the gift boxes in this collection, head over here.
DIY Die Cut Cylinder Boy Elf Gift Box
Here’s what you’ll need:
- a variety of colored cardstock (80lb. or less weight suggested)
- the Elvin the Elf Cylinder Gift Box die cuts
- a digital die cutting machine
- craft glue and / or double-sided adhesive (I highly recommend Scor-Tape – I used 1/4″ and 5/8″ sizes)
- scissors
- a sticky tool, like the Quick Stik or Pick Me Up (optional)
Instructions
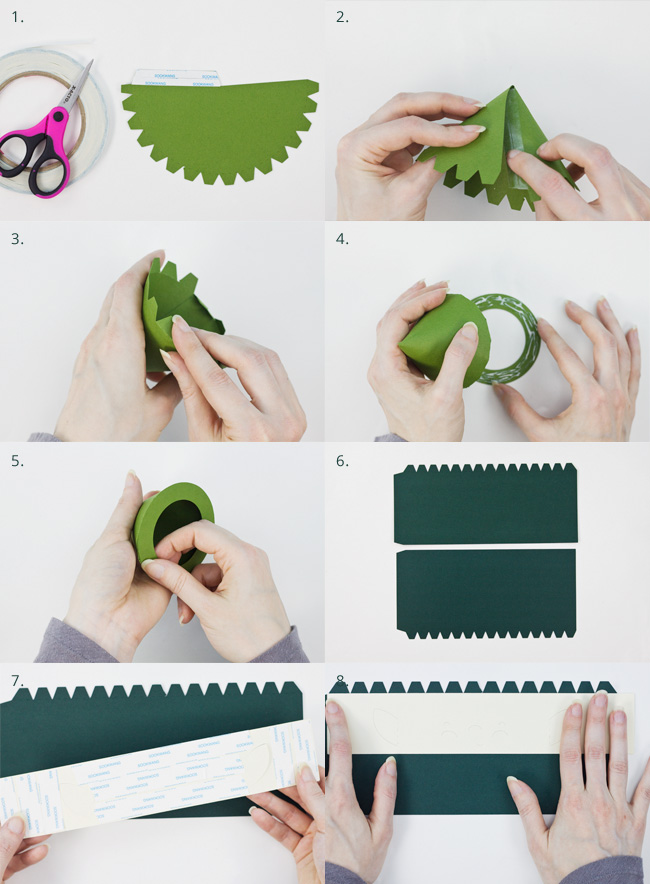
1. Add double-sided adhesive or glue to the side tab on the hat piece.
2. Fold one side of the hat piece around to create a cone shape. You may have to work the paper a little bit, bending and shaping it until it’s ready to curve into the cone shape. Thinner cardstock or paper is easier to manipulate. Once you have your paper shaped into a cone, adhere the two sides together, lining up the tabs along the bottom.
3. Fold the bottom flaps inward.
4. There are two ring die cuts in the box kit. One is slightly larger than the other. Add glue to the larger ring and press the cone down onto the ring, making adjustments to the tabs along the base where needed to line everything up. Hold the cone in place firmly for about 15 seconds.
5. If necessary, turn the cone over before the adhesive starts to dry, reach inside the bottom, and pinch any loose tabs down onto the ring. Set aside to dry.
6. The two largest pieces in this box kit (and all of the kits in this collection) are the box top and the box bottom. The box top (photo: top) is slightly shorter. The tabs are on the top for the box top and on the bottom for the box bottom, with the long tabs on the left on both.
7. Turn the face piece over to the back and place vertical strips of adhesive approximately 1/2” to 3/4” wide on either end, lining them up as close to the edge as you can. Then, cover the remainder of the back, minus the ear areas (leave those uncovered), with double-sided adhesive or glue. If using liquid glue, cover all but the ear areas and 1/2” to 3/4” wide strips on either end of the piece.
8. Remove the protective paper from all of the double-sided adhesive pieces EXCEPT the vertical strips on each end (if using this type of adhesive). Line up the top left corner of the face piece with the notch where the long side tab and first top tab meet on the box top. There will be an approximately 1/2” wide strip of the face piece that will go beyond the end of the box top on the right side. This is correct, and this area will come into play later in the assembly process. Press the face piece down onto the box top to adhere.
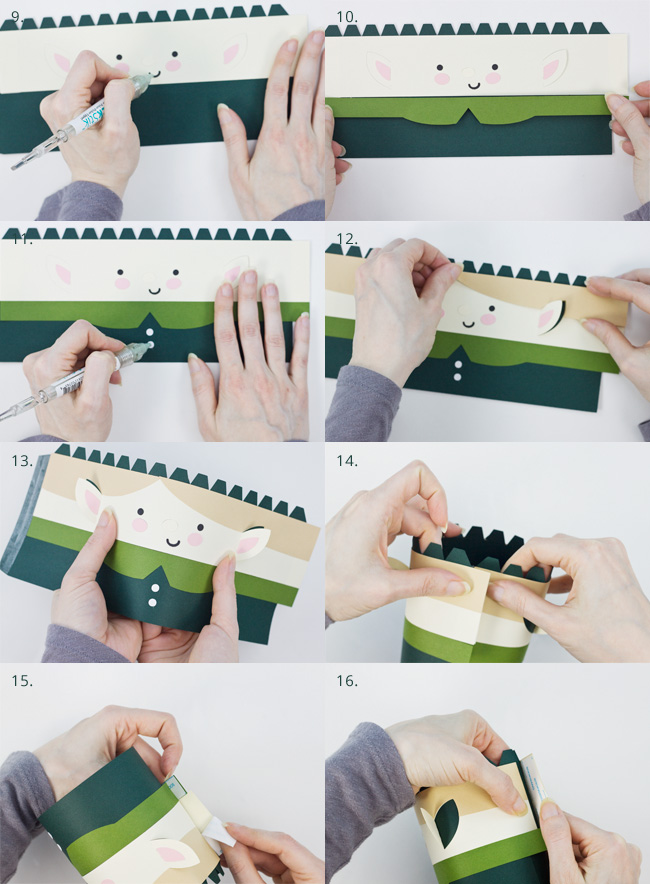
9. Glue the eyes, nose, cheeks, and mouth in place using the corresponding slits in the face piece as guides. Center the inner ear pieces against the score lines and glue in place. A sticky tool, like a Quick Stik or a Pick Me Up, isn’t necessary here but definitely comes in handy for placing smaller pieces like these.
10. Place small strips of double-sided adhesive along the left and right edges of the back of the collar piece. Leave these areas unglued if using liquid glue. Cover the rest of the back of the piece with adhesive or glue and, if using an adhesive with protective / backer paper, remove it from JUST the center area, leaving the paper on the strips along the left and right edges. Turn the collar piece over and line up the left side of the piece with the left side of the face piece on the box top base. Press in place directly beneath the face piece to adhere.There will be an approximately 1/2” wide strip of the collar piece that will go beyond the end of the box top on the right side, just as with the face piece earlier. This is correct, and this area will come into play later in the assembly process.
11. Center the button pieces under the collar and glue in place.
12. Line up the top left corner of the left hair piece with the top left corner of the face piece and glue into place. Line up the top right corner of the right hair piece with the top right corner of the face piece and glue into place. The hair pieces will overlap very slightly where they meet, with the right piece on top.
13. Add adhesive to the left tab of the box base. If using liquid glue, wait until after this step to add it so it doesn’t dry out. Because there are several layers of paper and adhesive or glue on the box base, it may be a little bit stiff. To get it ready for shaping into a cylinder, gently bend and curve the piece until it loses any stiffness. Three or four bends usually does the trick.
14. Fold the box top into a cylinder shape and line up the bottom of the left top tab as closely as possible with the notch between the right top tab and the long tab. Line up the bottom left corner as closely as possible with the notch where the long tab begins at the bottom of the box base. Press in place to adhere.
15. Remove the protective backing paper from the adhesive, or add glue if using liquid adhesive, on the portion of the face piece to the left of the back seam.
16. Adhere the piece in place.
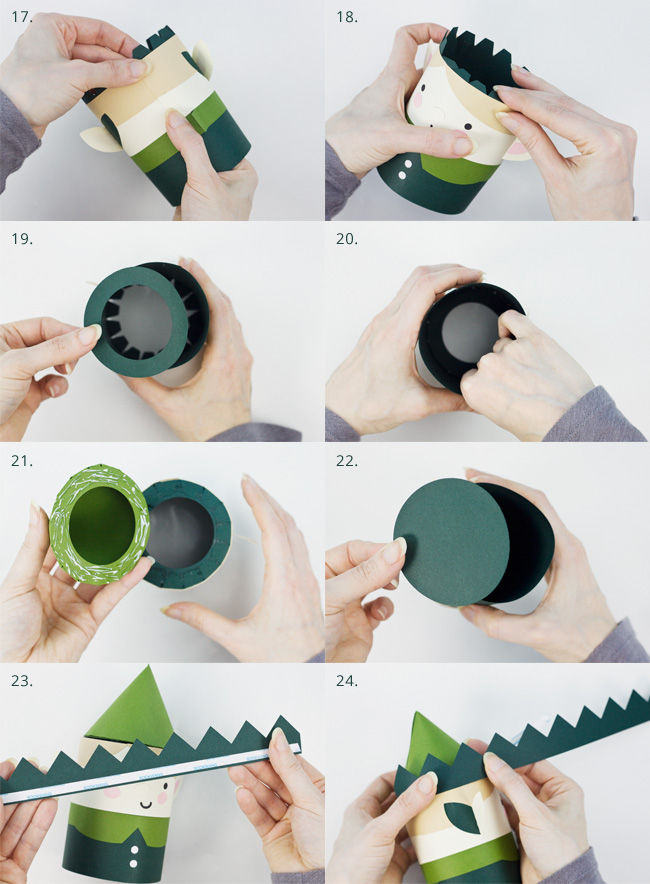
17. Remove the protective backing paper from the adhesive, or add glue if using liquid adhesive, from the still un-adhered portion of the face piece. Press in place over the piece in Steps 15 and 16 to adhere. Repeat this process for the ends of the collar.
18. If you haven’t already, fold the top tabs on the box top inward.
19. Turn the box top upside down . Cover the bottom of the remaining (slightly smaller) ring with liquid glue and place it down into the box top, glue side down.
20. Press the ring into place using your fingers.
21. Turn the box top over so the tabs are facing up. If necessary, adhere any loose tabs in place with glue. Cover the bottom of the hat piece with glue, line it up over the box top, and press into place.
22. There are three circle die cuts in the box kit. One is a bit larger than the other two. Cover the outer edge of the bottom of one of the two SMALLER circles with glue, and place it down inside the box top to cover the hole (don’t want candy getting caught up in the hat!). Press into place using your fingers.
23. Add double-sided adhesive to the bottom half of the trim piece for the elf hat. If using liquid glue, add glue in sections as you glue the trim to the box top so it doesn’t dry out while you’re working.
24. Start at the back seam on the box top and press the trim piece in place to adhere in sections as you work your way around. There will be some overlap after you work your way around the box top. Adhere the overlap in place on top of where you started.

25. To finish the box top, add a healthy amount of glue to the bottom of a cotton ball or pom pom and glue in place on top of the elf hat. Hot glue will work here, too.
For the Box Bottom
26. Add adhesive to the long tab on the left of the box bottom piece. Bend the piece into a cylinder shape and line up the bottom of the tab on the end as closely as possible with the notch where the bottom of the top tab and the long tab meet. Line up the bottom corner as closely as possible with the notch where the long tab begins at the bottom of the piece. Press in place to adhere.
27. If you haven’t done so already, fold the box bottom tabs inward.
28. Add glue around the edge of the smaller of the remaining two circles. Place the circle, glue side down, into the box bottom.
29. Press the circle into place using your fingers.
30. Turn the box bottom over so the tabs are facing up. Glue any loose tabs into place, if necessary. Cover the bottom of the remaining circle with glue, line up over the box bottom, and press into place to adhere.
31. Fill the bottom of the box with candy, gifts, or other goodies and slide the top of the box over the bottom to complete.

These ARE REALLY adorable! Love your ideas and such a well explained and documented tutorial.
Thanks so much, Denise!