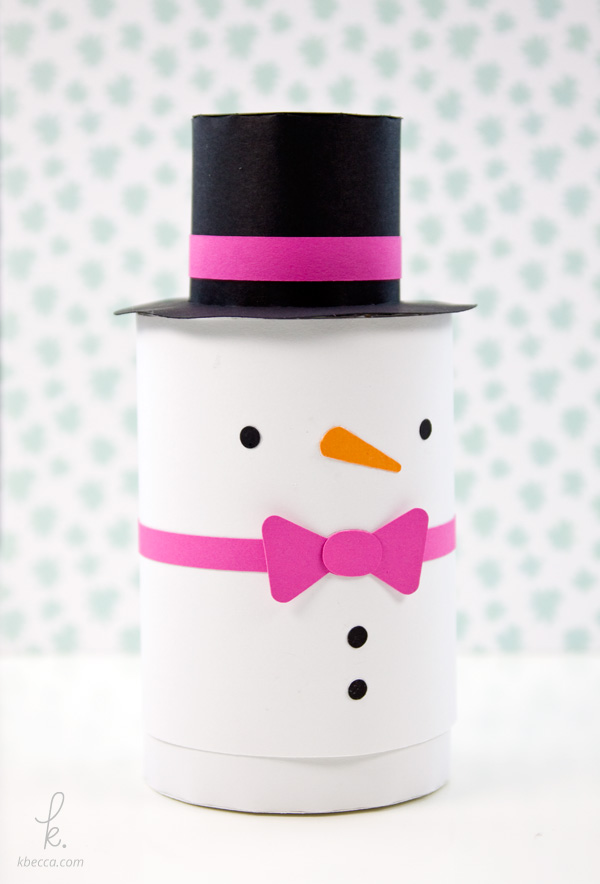
These are the assembly instructions for the Simon the Snowman cylinder gift box. To see all of the gift boxes in this collection, head over here.
DIY Die Cut Cylinder Snowman Gift Box
Here’s what you’ll need:
- a variety of colored cardstock (80lb. or less weight suggested)
- the Snowman Cylinder Gift Box die cuts
- a digital die cutting machine
- craft glue and / or double-sided adhesive (I highly recommend Scor-Tape – I used 1/4″ and 5/8″ sizes)
- scissors
- a sticky tool, like the Quick Stik or Pick Me Up (optional)
Instructions
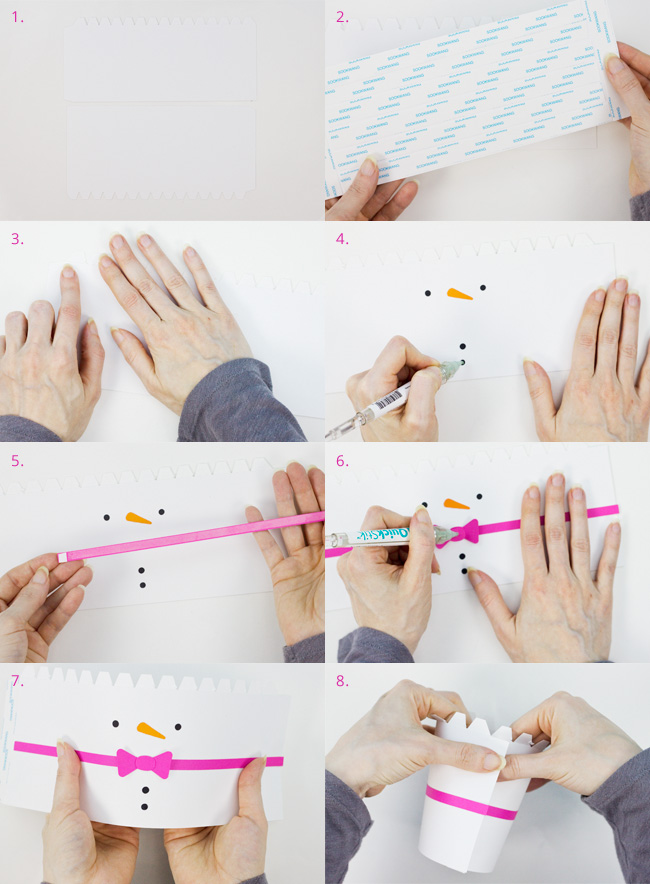
1. The two largest pieces in this box kit (and all of the kits in this collection) are the box top and the box bottom. The box top (photo: top) is slightly shorter. The tabs are on the top for the box top and on the bottom for the box bottom, with the long tabs on the left on both. Oopsie! I didn’t realize until I was processing the photos that the tab for the box bottom was turned to the right in this photo. You can really assemble the bottom of the box either way, but I like to keep both tabs on the left for uniformity.
2. Turn the face piece over to the back and place vertical strips of adhesive approximately 1/2” to 3/4” wide on either end, lining them up as close to the edge as you can. Then, cover the remainder of the back with double-sided adhesive or glue. If using liquid glue, cover all but 1/2” to 3/4” wide strips on either end of the piece.
3. Remove the protective paper from all of the double-sided adhesive pieces EXCEPT the vertical strips on each end (if using this type of adhesive). Line up the top left corner of the face piece with the notch where the long side tab and first top tab meet on the box top. There will be an approximately 1/2” wide strip of the face piece that will go beyond the end of the box top on the right side. This is correct, and this area will come into play later in the assembly process. Press the face piece down onto the box top to adhere.
4. Glue the eyes, nose, and coal/buttons in place using the corresponding slits in the face piece as guides. A sticky tool, like a Quick Stik or a Pick Me Up, isn’t necessary here but definitely comes in handy for placing smaller pieces like these.
5. Place small strips of double-sided adhesive along the left and right edges of the back of the bowtie collar. Leave these areas unglued if using liquid glue. Cover the rest of the back of the piece with adhesive or glue and, if using an adhesive with protective / backer paper, remove it from JUST the center area, leaving the paper on the strips along the left and right edges. Turn the bowtie collar piece over and line up the left side of the piece with the left side of the face piece on the box top base and the top of the piece with the corresponding slit on the face piece (center, just below the curved slit below the nose). Press in place to adhere. There will be an approximately 1/2” wide strip of the bowtie collar piece that will go beyond the end of the box top on the right side, just as with the face piece earlier. This is correct, and this area will come into play later in the assembly process.
6. Cover the center of the back of the bowtie piece with glue, line it up over the corresponding curved slit (right above the bow collar), and press in place to adhere. Glue the second layer of the bowtie (the center oval) in place over top of the bow piece.
7. Add adhesive to the left tab of the box base. If using liquid glue, wait until after this step to add it so it doesn’t dry out. Because there are several layers of paper and adhesive or glue on the box base, it may be a little bit stiff. To get it ready for shaping into a cylinder, gently bend and curve the piece until it loses any stiffness. Three or four bends usually does the trick.
8. Fold the box top into a cylinder shape and line up the bottom of the left top tab as closely as possible with the notch between the right top tab and the long tab. Line up the bottom left corner as closely as possible with the notch where the long tab begins at the bottom of the box base. Press in place to adhere.
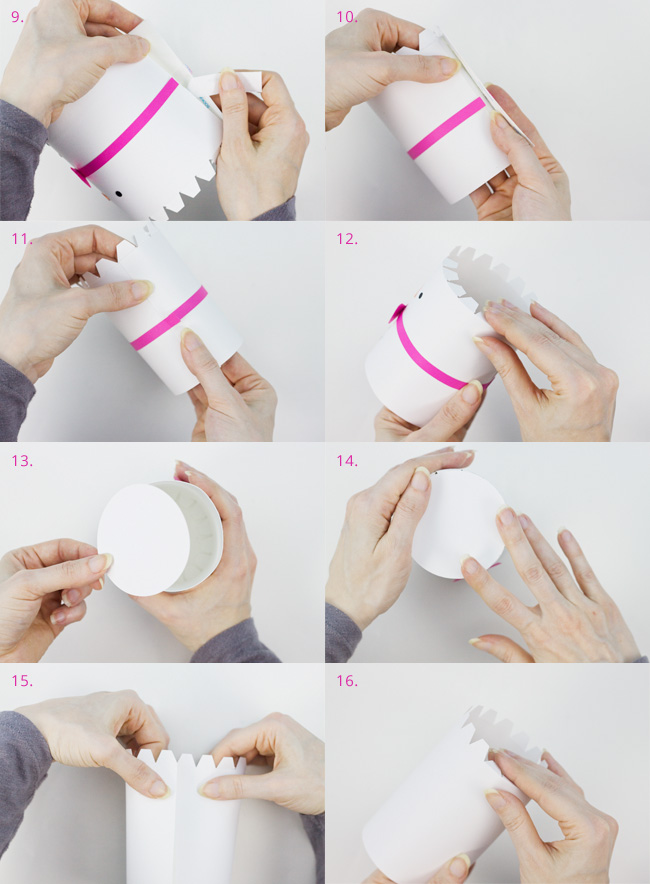
9. Remove the protective backing paper from the adhesive, or add glue if using liquid adhesive, on the portion of the face piece to the left of the back seam.
10. Adhere the piece in place.
11. Remove the protective backing paper from the adhesive, or add glue if using liquid adhesive, from the still un-adhered portion of the face piece. Press in place over the piece in Steps 9 and 10 to adhere. Repeat this process for the ends of the bowtie collar.
12. If you haven’t already, fold the top tabs on the box top inward.
13. Turn the box top upside down . There are six circles in this box kit. The two smallest are for the hat, which we’ll make a little later. For now, we’re focusing on the four larger circles. Two of the circles are slightly smaller than the other two. Cover the outer edge of one of the smaller two circles in the kit with liquid glue and place it down into the box top, glue side down. Press the circle into place using your fingers.
14. Turn the box top over so the tabs are facing up. If necessary, adhere any loose tabs in place with glue. Cover the bottom of one of the larger circles with glue, line it up over the box top, and press into place.
For the Box Bottom
15. Add adhesive to the long tab on the left of the box bottom piece. Bend the piece into a cylinder shape and line up the bottom of the tab on the end as closely as possible with the notch where the bottom of the top tab and the long tab meet. Line up the bottom corner as closely as possible with the notch where the long tab begins at the bottom of the piece. Press in place to adhere.
16. If you haven’t done so already, fold the box bottom tabs inward.
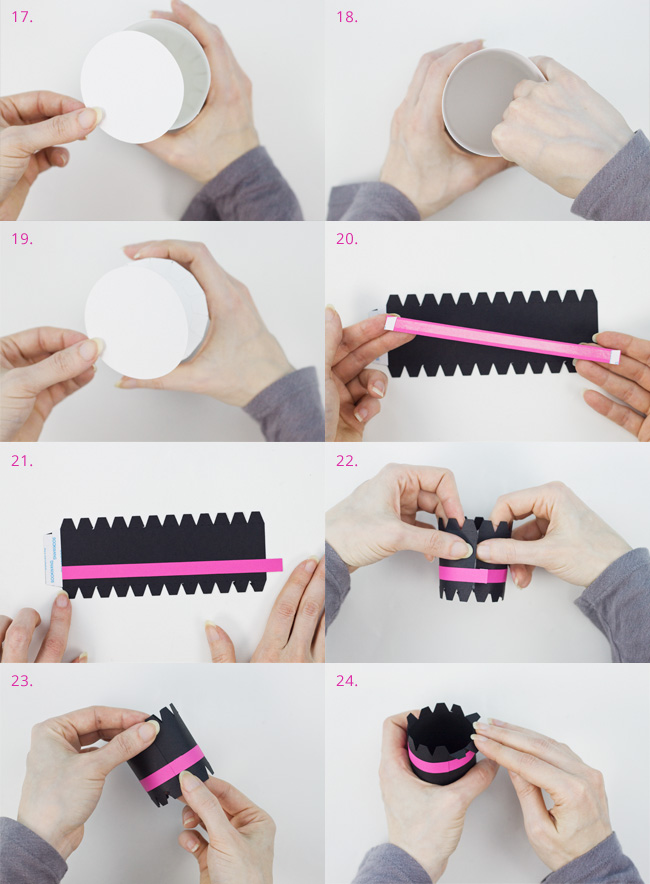
17. Add glue around the edge of the smaller of the remaining two circles. Place the circle, glue side down, into the box bottom.
18. Press the circle into place using your fingers.
19. Turn the box bottom over so the tabs are facing up. Glue any loose tabs into place, if necessary. Cover the bottom of the remaining circle with glue, line up over the box bottom, and press into place to adhere.
For the Hat
20. Add adhesive to the long tab on the left of the hat piece.
21. Place small strips of double-sided adhesive along the left and right edges of the hat band piece. Leave these areas unglued if using liquid glue. Cover the rest of the back of the piece with adhesive or glue and, if using an adhesive with protective / backer paper, remove it from JUST the center area, leaving the paper on the strips along the left and right edges. Turn the hat band piece over and line up the left side of the piece against where the adhesive is on the long side tab, about 1/4” above the bottom set of smaller tabs. There will be an approximately 1/2” wide strip of the hat band piece that will go beyond the end of the hat base on the right side. This is correct, and this area will come into play later in the assembly process.
22. Bend the hat piece into a cylinder shape and line up the bottom of the tab on the end as closely as possible with the notch where the bottom of the top tab and the long tab meet. Line up the bottom corner as closely as possible with the notch where the long tab begins at the bottom of the piece. Press in place to adhere.
23. Remove the protective backing paper from the adhesive, or add glue if using liquid adhesive, hat band piece to the left of the back seam. Adhere the piece in place. Remove the protective backing paper from the adhesive, or add glue if using liquid adhesive, from the still un-adhered portion of the hat band piece. Press in place over the piece that you adhered previously.
24. Fold the top set of tabs inward, and fold the bottom set of tabs outward.
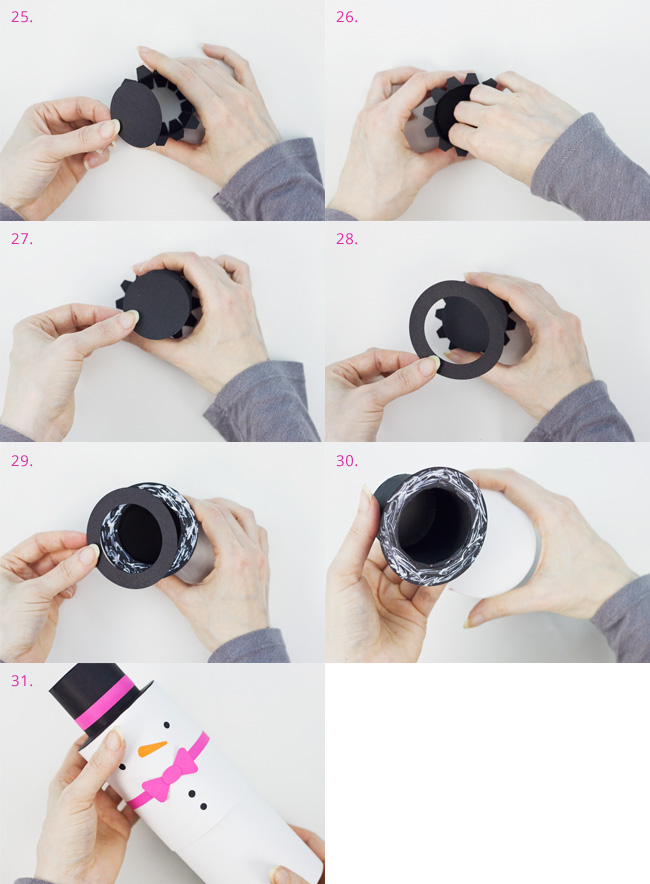
25. Add glue around the edge of the smaller of the two circles. Place the circle, glue side down, into the box bottom.
26. Press the circle into place using your fingers.
27. Turn the hat over so the inner facing tabs are facing up. Glue any loose tabs into place, if necessary. Cover the bottom of the remaining circle with glue, line up over the hat piece, and press into place to adhere.
Please note: I widened the brim of the hat a bit after taking the photos for this tutorial, so if the brim pieces don’t look exactly the same in the following steps, this is why.
28. Cover the bottom of one of the brim pieces (rings) with glue, place it over top of the hat piece, and slide it down to the bottom. Press down over the outward facing bottom tabs to adhere in place.
29. Turn the hat over and cover the bottom of the brim with glue. Line up the second brim piece (ring) over top and press it down onto the glued area to adhere in place.
30. Cover the bottom of the hat brim with glue and glue the hat in place on top of the top of the snowman box.
31. Fill the bottom of the box with candy, gifts, or other goodies and slide the top of the box over the bottom to complete.